Disney World First Haircut Review

It was a year ago this week that we went to Disney for the first time as a family. My uncle planned a group trip that we joined in on and, while I was very nervous about taking a 17 month old to Disney, it was a wonderful trip! 

I was talking with a friend who is a Disney expert before we left and she asked if we were going to get our little girl’s haircut while we were there. I believe my reaction was something “At Disney?! Huh??” She explained that Disney had a barber shop on Main Street where haircuts actually happened and that you could get a kid’s first haircut there. I didn’t have plans to get our little one’s haircut at that point, but days later the thought was still spinning in my head. I’m a sucker for a memorable moment with my little one and this seemed like an awesome one. 

After chatting with my hubby and the others that we were traveling with (who were all so sweet and said they would be excited to watch her get her haircut also), I called and scheduled a first haircut appointment for my little gal on the day we had planned to be in the Magic Kingdom. I was also informed that since we had the Disney PhotoPass as part of our vacation, a professional photographer would come to the barber shop if we asked and take pictures of her haircut. I was so excited that we were going to have professional photos of her first haircut and that we could focus fully on enjoying the experience without having to catch the photos ourselves!

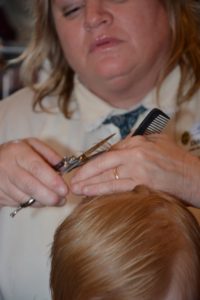
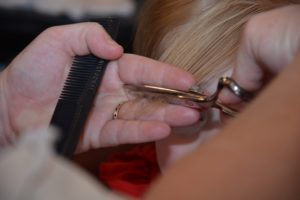
Naps didn’t go as hoped (but did go as expected) on our trip and by the third day when we were headed to the Magic Kingdom, I was really unsure how the haircut was going to go. Little gal wasn’t cranky, but wasn’t having as happy of a morning as we would have hoped. About an hour before her appointment, she fell asleep in her stroller, which was both a happy time but also caused me apprehension because we would have to wake her up for her appointment. We woke her up right when they called us in and she was still in a bit of a daze when we sat her in the booster seat. The wonderful lady who cut her hair, Diane, got to work right away, giving me a toy and covering her in Mickey stickers. Our little gal lit up at the stickers and was in a pleasant mood throughout the entire haircut. Diane did a great job and I was so happy that her first haircut was a positive experience for us all and that the photographer did a great job capturing it for us. 

In addition to the haircut, we got a locket of her hair to take home, plenty of pixie dust, a certificate, and a “first haircut” set of mouse ears. So adorable! If you’re on the fence about scheduling a first haircut while you’re at Disney, it’s definitely something you should go for! Such a sweet and memorable time. Worth the small financial and time investment for sure!

Lift and Find Toddler Game – Pin It or Forget It?

This toddler lift and find game offers a way to recycle wipes containers while providing a fun and educational game for your little one.  The only real challenge with this project is peeling off the wipes lids, but once that effort is over the rest is easy peasy. I used one of the free printables of shapes for this game, but I love that I can create my own games as well based on what we learning. I’m looking forward to using this game and having it grow with us! 

Pin: Toddler Lift and Find Game
Project Time: 20 minutes
Project Cost: Less than $1
Pin it or forget it? Pin it!

Pinspired: Ikea Bookshelves

I’ve always been a huge reader (thanks Dad and Mom for reading to me so much as kid and supplying my book habit!) and I feel like my love of reading helped me in so many ways throughout my life. It’s important to me that books an essential part of Little One’s upbringing and I want to make sure she always has books at her fingertips (or at Mommy and Daddy’s fingertips until she’s old enough to enjoy them on her own).  Our small rooms don’t accommodate large bookshelves easily, so when I saw this pin, I thought it was a brilliant idea!
 
Project Time: 1 hour or so
Project Cost: approx $5/shelf
Pin it or forget it? Pin it!
 
One of Little One’s aunties (who also purchased the spice racks for us on an Ikea trip) redid my former dresser and chest as her baby shower gift, so we didn’t want to mount the bookshelves directly to the beautiful piece. We decided to make a corner of her room for her books, near the glider where we will likely sit and read to her.
 
We found some great little paint samples at Lowe’s and picked one up in a bright green to compliment her room colors. I can’t take an credit for the implementation of this project, Hubby did it all from painting, putting them together, and mounting them to the wall. We did have issues mounting them to the wall due to the type of hanging areas on the back of the spice rack, but otherwise I’m really happy with how they turned out! The hold her books well and add a nice little pop of color to the corner area. There’s no way we would have had room for a bookcase right now, so this was a wonderful solution.

Pinspired: Baby Blanket Ladder


Little One was blessed to receive many blankets in preparation for her arrival, including some beautiful handmade pieces. My mom mentioned an idea like this and I said that I knew I had seen it somewhere before. Funny enough, a few weeks later I was perusing my boards (what, you don’t browse your boards for fun?) and found that I had pinned it at least a year earlier! I explained my idea to the Hubby and thankfully he agreed to make it for Little One’s room.
 
Project Time: 2-3 hours
Project Cost: approx $20
Pin it or forget it? Pin it*
 
*I will say the Hubby handled this project completely from start to finish and at the end, he wasn’t thrilled how it came out (although I was). So please consider that when deciding to take on the project.
 
The Hubby made this with two pieces of wood (I’m not sure on the specifics of sizes) and dowel rods. We decided on a nice cream color to paint the sides, since we thought that a color might draw attention away from the beautiful blankets. The rods didn’t need painted since they would be covered. 
 
I love how her blanket ladder turned out! It is one of my favorite pieces in our house. It’s a great display for some of her blankets, adds decoration to her room, and doesn’t take a lot of space. If we had more room, I’d ask the Hubby for another for our blankets… but even 6+ months later I’m not sure he has recovered from making it. 

Mudpie’s Crochet Easter Basket


While there are many beautiful Easter baskets on market these days, I knew that I wanted to crochet Mudpie’s first Easter basket for her. I loved the idea of it being her “main gift” this first Easter and something that could be used for several years as she grew. While I probably could have figured out a pattern on my own, I try to remember that it’s silly to reinvent the wheel and set out on my own Easter search. 


I found this adorable pattern by Jam made that was just the style I was looking for. I decided to use the yarn I had left over from her baby blanket as the color pallet. I had bought extra of each color to have for other items for her since I think it’s fun that many of her items coordinate. 

 
The pattern is simple and delightful to work up. I haven’t worked with two strands of yarn at the same time before, but was surprised to find that it wasn’t nearly as difficult as I thought it would be. Working with two strands created a nice and sturdy basket. The handles are sturdy too, although I find that when lifting it from the handle the basket bends just slightly so I’m thinking about maybe adding a cardboard base next year. For this year it’s fine though. I think the size works well – small but still large enough to fill with goodies or eggs. I even added an extra element not in the pattern that really pushed this project over the edge into “Love!” land for me. I’ll share that and what is going to be in Mudpie’s basket this year a little later in the week, so stay tuned! 

Three Fun Things to Do When You Find Out You’re Pregnant

As soon as you find out your pregnant, it feels like the onslaught happens. You start to see articles everywhere about getting ready for baby. People start sharing their advice for you. And the moment you purchase your first baby item you start to get all sort of targeted mailers about pregnancy (despite my marketing degree, I’m still not sure exactly how this happens even if you don’t give your address, but it seems to). So I’m not sharing about what “they” say you should do when you find you’re pregnant. I’m sharing a few fun things that I did early in my pregnancy that I’m glad I decided to do.

1. Sign up for a mailing list (or two), but make sure they align with what you want to know.
I promised myself (and the Hubby) that I would work hard to avoid as much as I could about scary pregnancy stories. I deal with hypochondria (and overactive imagination) in my mind and knew it would not be helpful to anyone in my family if I got worked up over the worst case scenarios.  I limited my weekly readings to a mailing list that focused on my baby’s development (My Pregnancy This Week from BabyCenter), a clever book my mom found at a yard sale (The Pregnancy Countdown Book), and the wonderful and funny mailing list that almost always shares something I’m going through that week (Alpha Mom Pregnancy Calendar).  It’s really fun reading each week about what is going on in my body and I’ve found in surprisingly comforting when the information I’ve read matches up with what I have experienced (Oh you mean that heartburn I’m feeling is right on time? Good to know!).


2. Start noting down at least a few things going on with you to look back on.
I haven’t gone crazy recording down every little thing in my pregnancy,  but I have tried to note down the big things (like the first time Daddy felt her kick and when we announced her name to the world).  I also started doing weekly bump photos at about 11 weeks. I started a digital baby book in Evernote (more on that later) where I’ve been saving everything. I hope to put some of these notes together to print out in a legit baby book sometime but at least I have them saved for now. Even though she’s not here just yet it’s amazing how far away some of the things from the beginning of my pregnancy feels and it’s fun to be able to go back and look at those things now.


3. Figure out how you want to share what’s going on with your framily. 
It’s hard to keep track of who you have shared what with. There are a lot of of great options for sharing your updates and photos and it can be a tough decision.


After much consideration we decided we would share via a private Google+ page. No matter what way you decide to share with your close people, go ahead and start sharing those fun updates and photos. Those who are interested will love it and it. It will give you a great way to connect with those people.


Little One’s Blanket


When I got to the stage that my friend circle began having babies, I decided I really wanted to have a standing gift that I could give to welcome all the kiddos into the world. It needed to be useful and able to be personalized for each family. And simple because, let’s face it, I don’t do well with complicated projects on a deadline and I’d prefer to give them to the mommas before the baby is born, not on their first birthday!


I decided on crocheting a small baby blanket that could be customized with the baby’s room colors. I make them in cotton or acrylic so that it can be used and washed. Typically I make them from the Tiramisu Baby Blanket pattern, which is a really beautiful pattern, but I have ventured into some different designs as well. I love that I can make the blanket special for each family and pray over that child while I’m crocheting. It makes it feel like I can stitch a little extra love for them.


When I found out I was expecting Little One, I knew she needed to have her own special blanket made by Mommy. I knew she would be getting several baby blankets (and she did get some beautiful ones from people who love her already) so I decided to make her a blanket that will fit her bed when she’s a toddler and will be big enough to wrap around her when she can toddle in to watch tv with Mommy and Daddy on the couch.


I decided on the Granny Stripe Blanket pattern, since it was a pattern that I’ve been eying for awhile. It was really a wonderful pattern and a joy to make, even at a larger size. I usually get downtrodden about halfway through big projects like blankets, but did not with this pattern. Surprisingly enough, I was even able to get this done before her baby shower!
I also took my time picking the colors. This was the first time I’ve really used Pinterest to pin color pallets and narrowing down what I wanted the feel of her room to be like. When I got word that Little One was a she, I finalized my plans and picked out the yarn at Hobby Lobby. They have beautiful colors in “I Love This Yarn” that are reasonably priced and feel nice and soft.
 
 
Overall I’m very happy with how it turned out. I’d like the edging to look a little smoother, but I can deal with that. I love the reverse crab stitch that I used on the outermost edging. The colors are bright and remind me of a fun woodland scene, which is what I was going for. Hopefully Little One will like it just as much!